
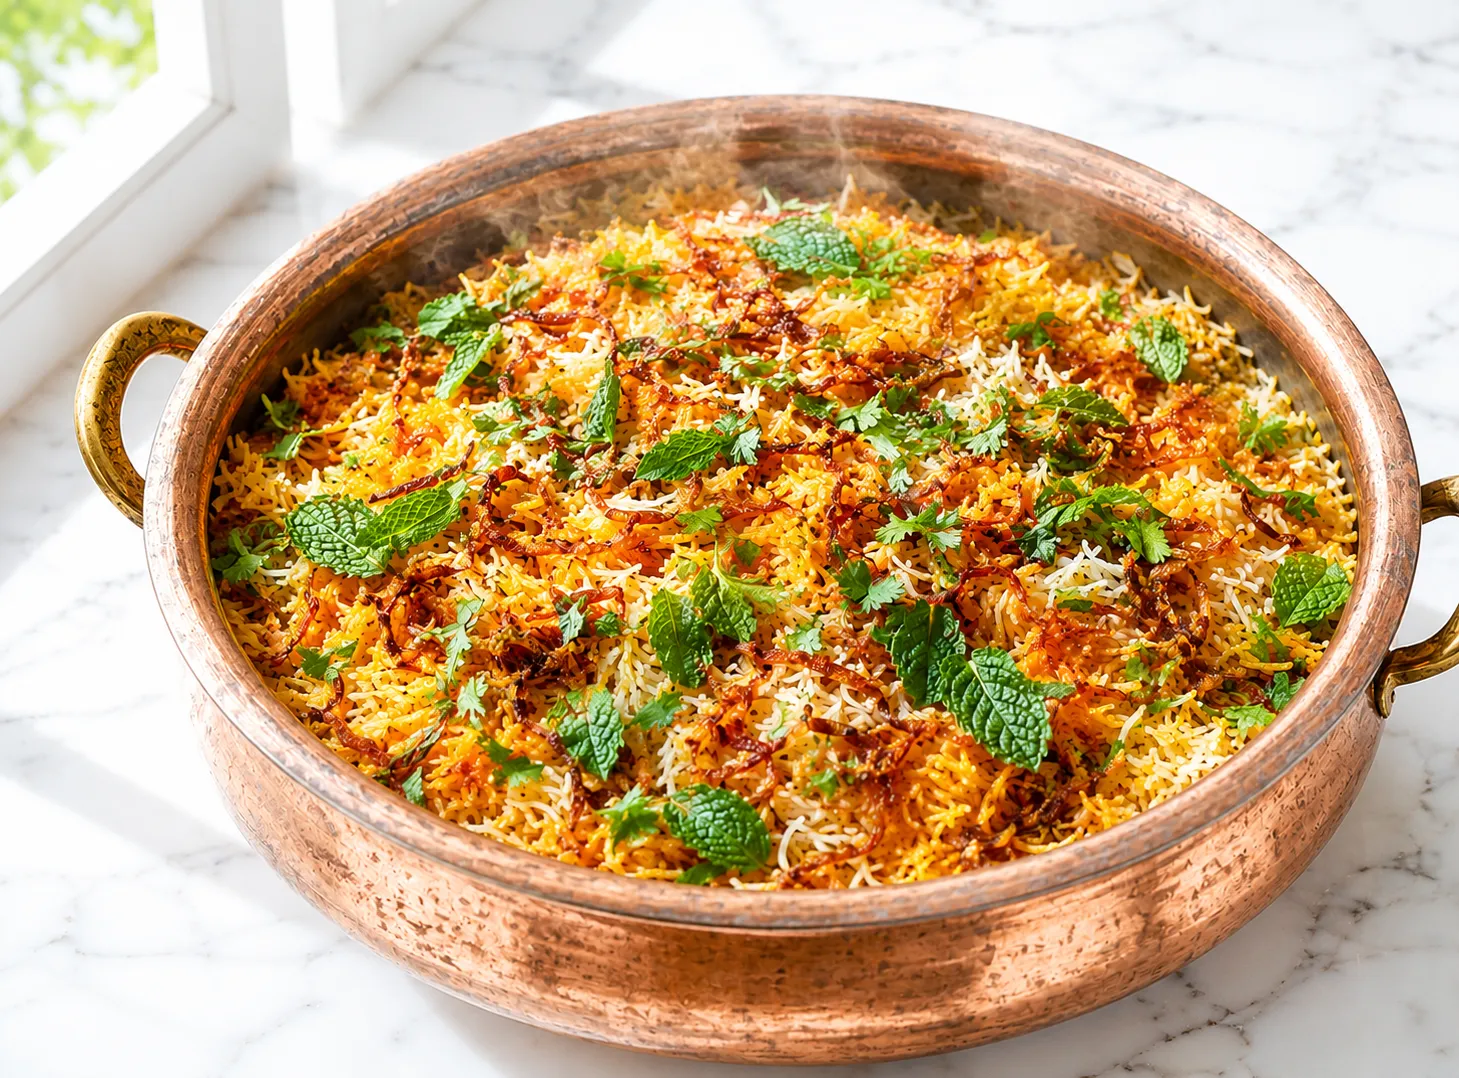
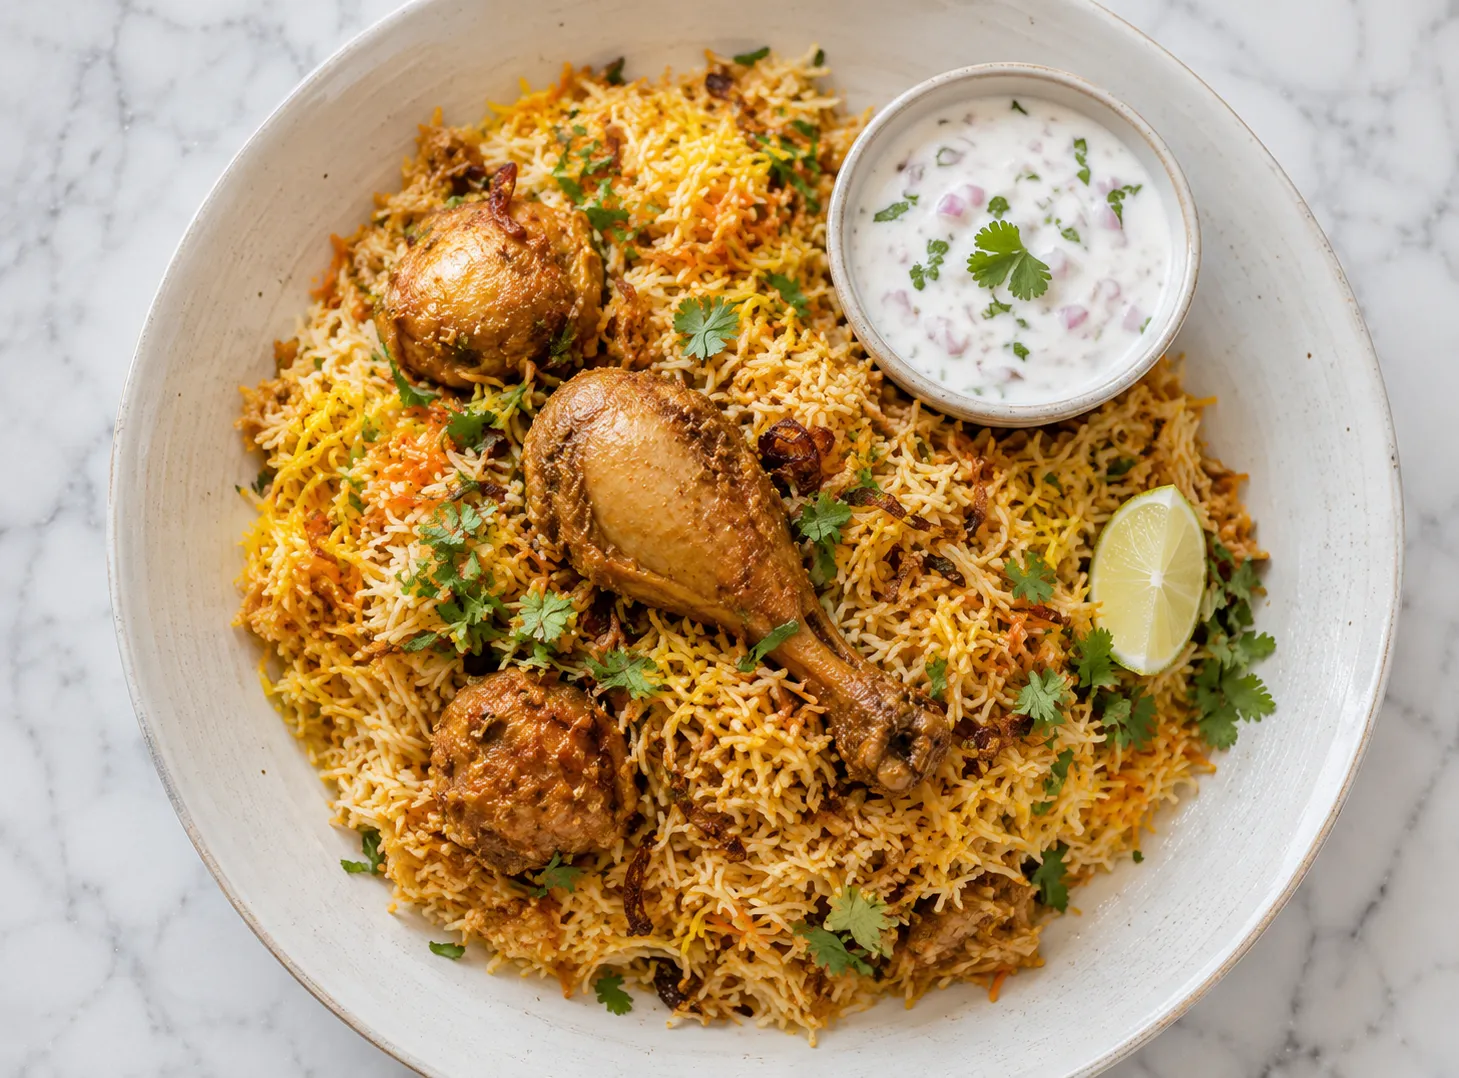
This biryani recipe is the kind you make when you want the real thing. Deeply spiced chicken, slow-cooked in a rich masala, layered with long-grain basmati rice, saffron milk, fried onions, and fresh herbs, then sealed and finished on low heat so everything steams together and the flavors actually develop. It takes time, but none of it is complicated. The process is straightforward once you understand the logic behind each step. If you have been looking for a biryani recipe that delivers a proper result at home without shortcuts, this is it. Follow the steps, trust the timing, and you will get a pot of biryani that tastes the way it should.
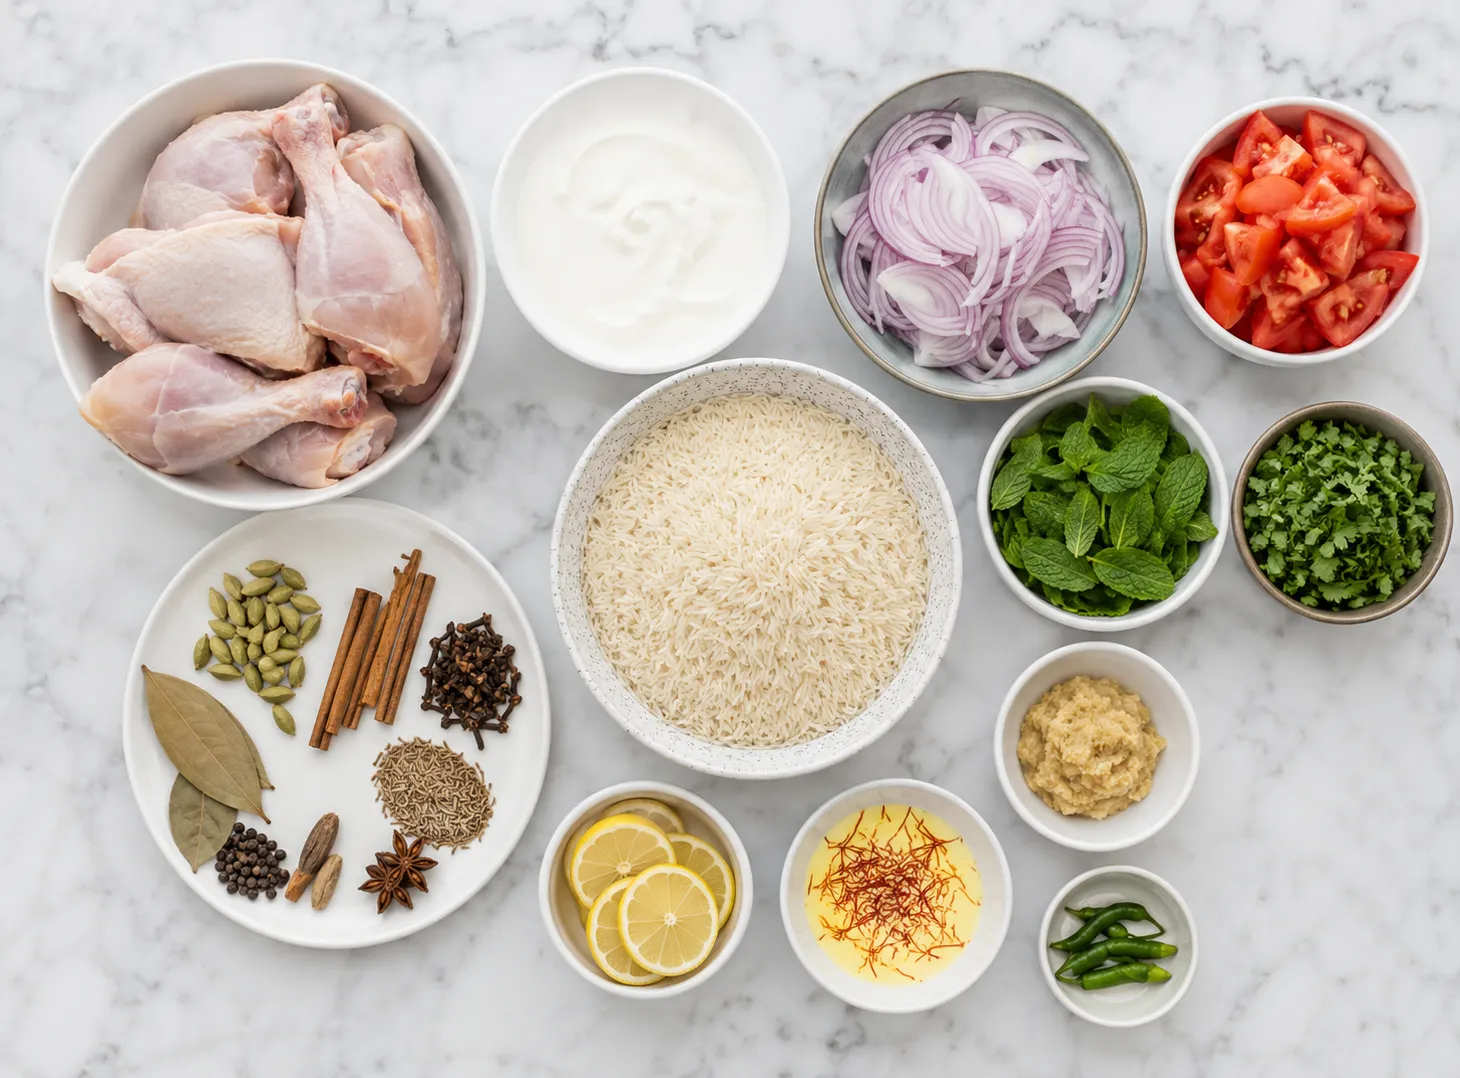
- 1.5 kg bone-in chicken pieces, skin removed , Thighs and drumsticks work best. Breast pieces dry out.
- 1 cup full-fat plain yogurt
- 2 teaspoons red chili powder
- 1 teaspoon turmeric powder
- 1.5 teaspoons garam masala
- 1 tablespoon ginger-garlic paste
- 1.5 teaspoons salt
- 2 tablespoons oil
- 3 cups aged basmati rice , Soak for 30 minutes before parboiling. Do not skip.
- 4 green cardamom pods , Lightly crushed
- 2 bay leaves
- 4 cloves 4 cloves
- 1 inch cinnamon stick
- 1 teaspoon salt , For the boiling water
- 1 teaspoon oil , Helps keep grains separate
- 3 medium onions, thinly sliced , For frying into birista and cooking the gravy
- 3 medium tomatoes, chopped
- 1 tablespoon ginger-garlic paste
- 2 green chilies, slit
- 1 teaspoon cumin seeds
- 1 teaspoon coriander powder
- 1 teaspoon red chili powder
- 1 teaspoon salt , Adjust to taste
- 4 tablespoons oil or ghee
- 3 tablespoons ghee
- 1 pinch saffron soaked in 3 tablespoons warm milk , Soak for at least 10 minutes before using
- 1 handful fresh mint leaves
- 1 handful fresh coriander leaves
- 1 cup fried onions (birista) , Store-bought or homemade. Make extra and store in the fridge.
- Large heavy-bottomed pot or Dutch oven, 5 to 6 quart
- Wide mixing bowls, at least 2
- Fine mesh strainer
- Sharp knife and cutting board
- Measuring cups and spoons
- Tongs or slotted spoon
- Tight-fitting lid or aluminum foil for sealing
- Skillet or frying pan for onions
- Flat iron tawa pan to place under the pot during dum, optional but helpful on gas stoves
- Marinate the chicken and refrigerate for at least 2 hours.
- Wash and soak the basmati rice for 30 minutes.
- Fry the onions low and slow until deep golden brown, then set aside.
- Cook the masala base, add the marinated chicken, and cook until about 80 percent done.
- Parboil the rice to 70 percent in spiced water and drain fast.
- Layer rice over the chicken with ghee, saffron milk, herbs, and fried onions.
- Seal the pot and cook on the lowest heat for 20 to 25 minutes.
- Rest for 15 minutes before opening and serving.
- Combine chicken with yogurt, red chili powder, turmeric, garam masala, ginger-garlic paste, salt, and oil in a large bowl.
- Mix until every piece is evenly coated. Cover and refrigerate for at least 2 hours. Overnight gives better flavor.
- Rinse basmati rice under cold water until the water runs clear.
- Soak the rinsed rice in cold water for 30 minutes, then drain and set aside.
- Heat oil in your heavy-bottomed pot over medium-high heat.
- Add sliced onions and fry, stirring often, until they are deep golden brown and crisp. This takes 15 to 20 minutes. Remove and drain on paper towels.
- In the same pot, add more oil or ghee if needed. Add cumin seeds and let them sizzle for 30 seconds.
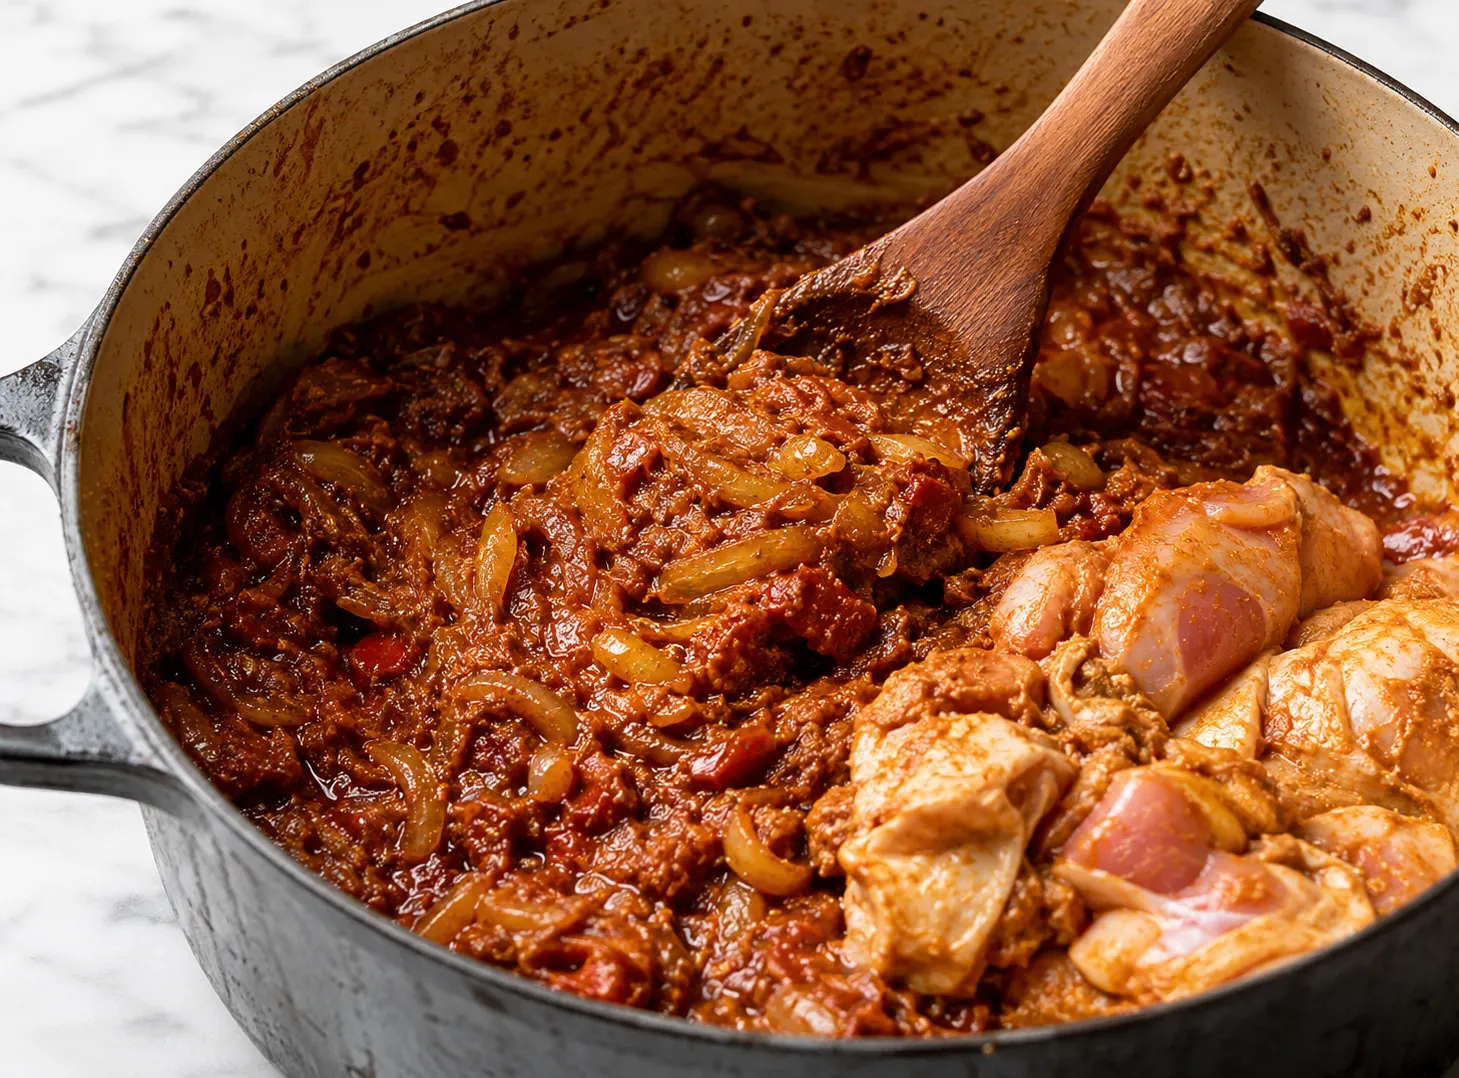
- Add ginger-garlic paste and cook for 1 minute. Add green chilies and tomatoes.
- Cook on medium heat until the tomatoes break down completely and oil separates from the masala, about 10 to 12 minutes.
- Add coriander powder, red chili powder, and salt. Stir and cook for 2 more minutes.
- Add the marinated chicken to the masala. Toss to coat evenly.
- Cook on medium heat, stirring occasionally, until the chicken is about 80 percent cooked and the gravy has thickened, roughly 20 to 25 minutes. Oil should visibly separate at the sides. Remove from heat.
- Bring a large pot of water to a rolling boil. Add cardamom, bay leaves, cloves, cinnamon, salt, and oil.
- Drain the soaked rice and add it to the boiling water. Cook for exactly 6 to 7 minutes. The grains should be firm with a slight bite in the center, not fully cooked.
- Drain the rice immediately through a fine mesh strainer. Do not rinse.
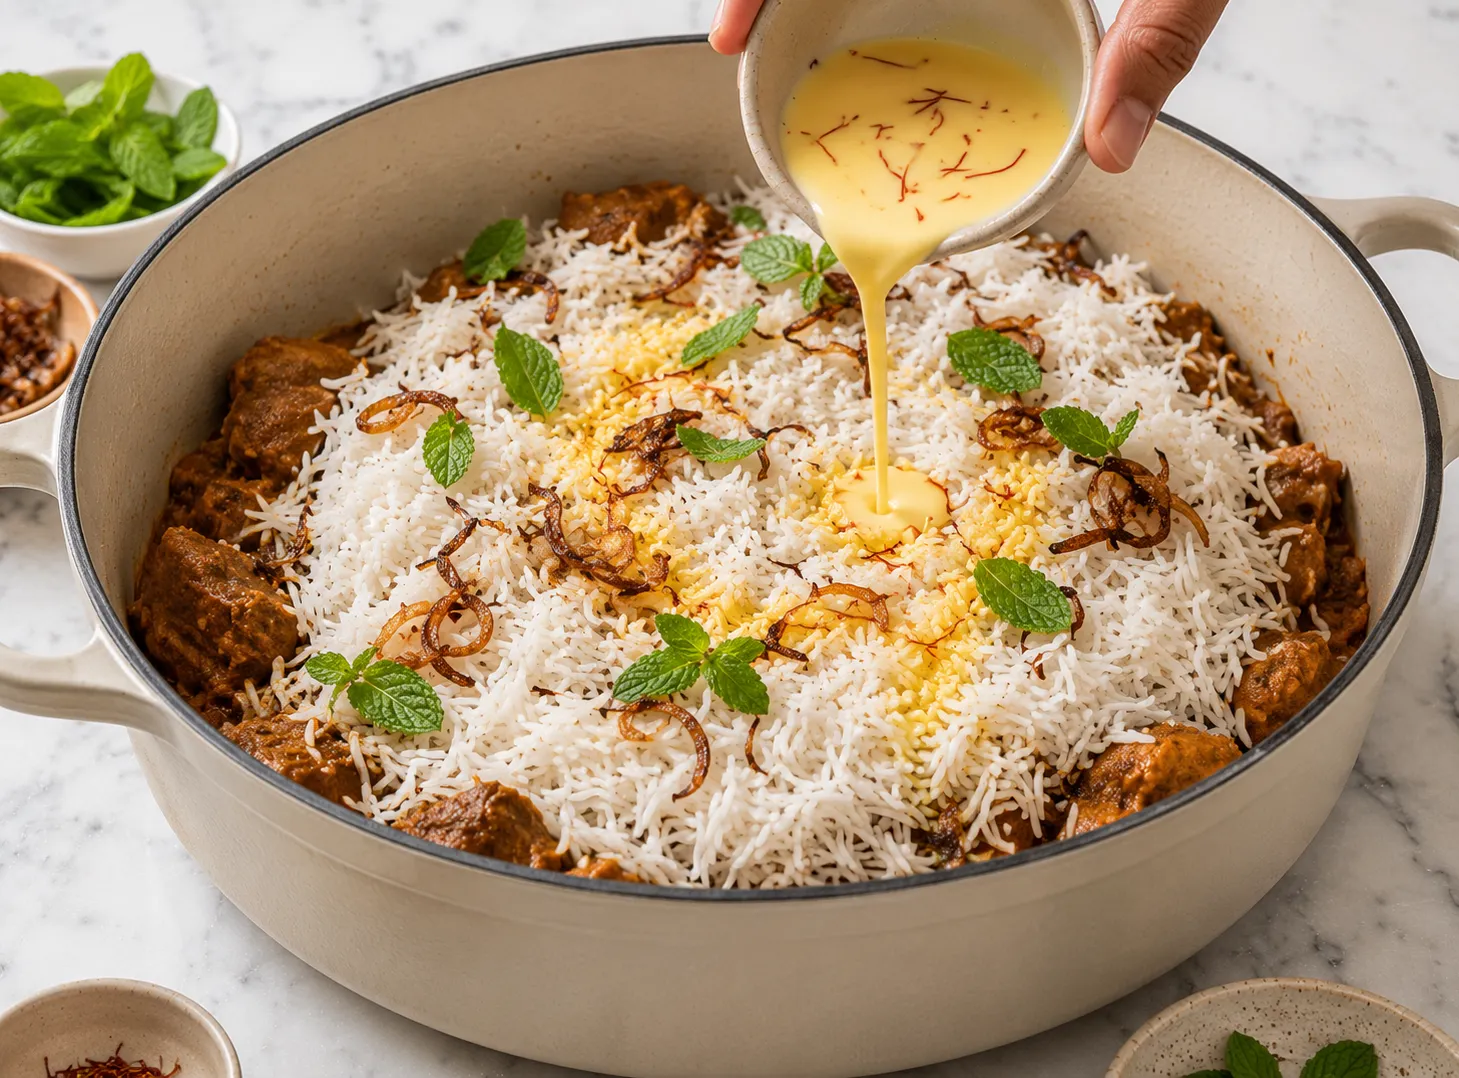
- Spread half the parboiled rice in an even layer directly over the chicken in the pot.
- Drizzle 1.5 tablespoons of ghee over the rice. Scatter half the mint, half the coriander, and half the fried onions.
- Add the remaining rice in a second even layer on top.
- Drizzle the saffron milk slowly over the top layer. Add the remaining ghee, herbs, and fried onions.
- Cover the pot tightly. If the lid does not seal well, lay aluminum foil underneath it and press the edges down. Place a heavy object on top.
- Cook on the lowest possible heat setting for 20 to 25 minutes. Use a tawa under the pot on gas stoves to distribute heat evenly and prevent scorching.
- Turn off the heat and leave the pot sealed for 15 minutes. Do not open it early.
- Open the lid and gently fluff the biryani from the sides using a wide spoon. Do not stir aggressively. Serve hot.
- Use aged basmati rice. Fresh rice absorbs water faster and breaks down during parboiling.
- Soak the rice for the full 30 minutes. Dry rice cracks when it hits the boiling water.
- Pull the rice off the heat when it is 70 percent cooked. It finishes on dum. Fully cooked rice at this stage means mushy biryani.
- Fry the onions slowly and patiently. The deep color and caramelized sweetness they develop is a core part of the flavor.
- Soak saffron in warm milk, not hot and not water. Warm milk draws out the best color and aroma.
- Use a heavy-bottomed pot. Thin pots burn the bottom layer during dum.
- Place a flat tawa pan under the biryani pot on a gas stove to spread the heat evenly.
- Do not skip the 15-minute rest after dum. The steam continues working even after the heat is off. Open the pot too soon and the top layer of rice will be underdone.
- Not marinating long enough. Two hours is the minimum. Less than that and the chicken stays surface-seasoned.
- Overcooking the rice during parboiling. You cannot fix mushy rice at the layering stage.
- Not sealing the pot properly. Escaping steam means the rice will not finish cooking evenly.
- Cooking the dum on medium or high heat. Low heat is not optional here. High heat scorches the bottom.
- Using too little salt in the boiling water. The rice gets seasoned at this stage. Under-salted water gives flat-tasting rice no matter how good the masala is.
- Stirring the biryani vigorously when serving. Fold gently from the edges inward to keep the layers intact.
- Using boneless chicken breast. It dries out during the long cook time. Bone-in thighs and drumsticks hold moisture.
- Mutton Biryani: Replace chicken with bone-in mutton. Pressure cook the mutton separately until about 80 percent tender before building the masala and layering.
- Vegetable Biryani: Use a mix of potatoes, carrots, peas, and cauliflower. Reduce the masala cook time to around 15 minutes since there is no raw meat to cook through.
- Egg Biryani: Hard-boil eggs, peel them, and fry in spiced oil until the outside turns golden. Layer in place of chicken.
- No saffron: Dissolve a small pinch of turmeric in warm milk. The color will be more yellow than golden but the effect is similar.
- No ghee: Substitute neutral oil throughout. The dish will be lighter but it still works.
- Less spicy: Cut the red chili powder in half and leave out the green chilies. The aromatics still come through clearly.
- Oven dum method: Layer the biryani in a wide oven-safe dish, seal tightly with foil, and bake at 300 degrees Fahrenheit for 25 minutes.
- Raita made with plain yogurt, grated cucumber, roasted cumin, and salt
- Mirchi ka salan, a green chili curry that is the classic pairing with Hyderabadi-style biryani
- Shorba, a thin spiced broth served in small cups alongside the rice
- Sliced raw onions with a squeeze of lime and a pinch of salt
- Kachumber salad with diced tomato, onion, cucumber, fresh coriander, and lime juice
- Pickle, mango or mixed vegetable, for sharpness and contrast
- Roasted or fried papad
- Refrigerate leftover biryani in an airtight container for up to 3 days.
- For longer storage, freeze in portion-sized containers for up to 1 month.
- Keep raita and salad stored separately. Never mix them into the biryani before storing.
- Stovetop reheating: Add 2 to 3 tablespoons of water to a pan, add the biryani, cover, and heat on low for 8 to 10 minutes.
- Microwave reheating: Place in a microwave-safe bowl, sprinkle a tablespoon of water over the top, cover with a damp paper towel, and heat in 90-second intervals until hot throughout.
- Do not reheat more than once. The rice texture falls apart after the second reheat.
Aged long-grain basmati rice. It holds its shape during parboiling and absorbs the spiced steam without clumping. Avoid short-grain or regular white rice as they break down and turn sticky.
Yes. Use any wide deep pot with a tight lid and place a flat tawa or iron pan underneath it on the burner during dum cooking. This distributes heat evenly and prevents the bottom layer from scorching.
You will see steam escaping around the lid edges and the spice aroma will intensify noticeably. After 20 to 25 minutes on the lowest heat, turn it off and let the pot rest sealed for another 15 minutes before opening.
Yes, and it actually improves the result. Cover the bowl and refrigerate. Take the chicken out 30 minutes before cooking so it is not ice-cold when it goes into the hot pan.
Almost always it comes down to overcooking during parboiling. Pull the rice at 70 percent done, which means firm with a slight bite in the center. Also check that the rice was soaked long enough before boiling.
You can cook the chicken masala and layer everything up to 12 hours ahead, then refrigerate the assembled pot without sealing. Do the dum cooking just before serving. The flavors actually develop more during that rest time.
- The ratio for parboiling basmati is roughly 1 cup rice to 6 cups water. Use plenty of water and drain fast once the rice hits 70 percent.
- Birista can be made in large batches and stored in the fridge for up to 2 weeks. Having it ready cuts prep time significantly.
- Bone-in thighs and drumsticks give the best result. Avoid using only breast pieces as they dry out.
- Fresh whole spices make a noticeable difference. Old cardamom and cloves give weaker aroma.
- If your saffron is older, steep it in warm water instead of milk for a stronger color release.
- This recipe scales up well. Double all ingredients and use a larger pot. Dum time stays the same.
- Garam masala varies a lot by brand. Taste your spice blend before committing to the full quantity.
A good biryani recipe does not ask for anything complicated. It asks for attention at the right moments: getting the marinade time in, pulling the rice at the right stage, sealing the pot properly, and giving it the rest it needs. The technique is the recipe. Once you have made this once and seen how each step connects to the next, you will not need to second-guess anything. The marination builds the base. The masala carries the depth. The dum brings it all together. Nail those three things and you will have a pot of biryani that tastes like it took far more effort than it actually did. The layers, the aroma, the rice that holds its shape while still being tender enough to fall apart in the mouth. That is what this biryani recipe is built to give you, consistently, every time you make it.